
Build an

Based on my previous reverse engineering work of AWS Lambda (take a look here) it’s time for a reassembling of the captured parts. We will craft an dockerized version of AWS Lambda. This foundation will be based on the Amazon Linux Dockerimage. Docker rocks - but the real AWS Lambda tells from itself, that it’s an EC2 instance. In my opinion it still must be some sort of a container system (yes I know that Firecracker and Bottlerocket exist) but there must also be a difference for the real one. This drill here helps me to understand and learn in which way such a container system could work and look like.
To make some faster progresses this work will have a heavy use of GitHub Actions and Docker flow including GitHubs own Image Registry. Just take a look at the Actions part of the repository.

=> The Code can be found here

To have a multipurpose Image let’s try to craft a genuine AWS Lambda Base Image. We use the amazonlinux Dockerimage to install the required dependencies and move the dependencies into an empty fresh image. From there we can build it up from scratch and reuse some files that were streamed from an AWS Lambda function into a S3 Bucket. The files were cleaned up by every runtime specific belongings. There are also a lot of interesting files and also it seems a cooperation between RedHat and Amazon
######
## Stage 1: Build an amazonlinux flavoured Image and inject the captured files
######
FROM amazonlinux:2 as builder

# Copy manual extracted files which were captured from AWS Lambda
ADD ./extracted_files.tar.gz /asimovlambda/

# Install the required AWS Dependencies
RUN yum --installroot=/asimovlambda reinstall -y  \
                                    filesystem-3.2-25.amzn2.0.4 \
                                    setup-2.8.71-10.amzn2.0.1 \
                                    glibc-2.26-39.amzn2 \
                                    glibc-common-2.26-39.amzn2 \
  # Remove the garbage
  && yum --installroot=/asimovlambda clean all

######
## Stage 2: Create a smaller Asimov Lambda BaseImage
######
FROM scratch

# Copy the installed OS files to the root dir
COPY --from=builder /asimovlambda /

ENV PATH=/usr/local/bin:/usr/bin/:/bin:/opt/bin \
    LD_LIBRARY_PATH=/lib64:/usr/lib64:/var/runtime:/var/runtime/lib:/var/task:/var/task/lib:/opt/lib \
    LANG=en_US.UTF-8 \
    TZ=:UTC \
    LAMBDA_TASK_ROOT=/var/task \
    LAMBDA_RUNTIME_DIR=/var/runtime \
    _LAMBDA_CONTROL_SOCKET=14 \
    _LAMBDA_SHARED_MEM_FD=11 \
    _LAMBDA_LOG_FD=9 \
    _LAMBDA_SB_ID=7 \
    _LAMBDA_CONSOLE_SOCKET=16 \
    _LAMBDA_RUNTIME_LOAD_TIME=1530232235231 \
    _AWS_XRAY_DAEMON_ADDRESS=169.254.79.129 \
    _AWS_XRAY_DAEMON_PORT=2000 \
    _X_AMZN_TRACE_ID='Root=1-6217f7ab-1f6b3ebf2a1811227263a659;Parent=5c39ff32e875095b;Sampled=1' \
    AWS_XRAY_DAEMON_ADDRESS=169.254.79.2:2000 \
    AWS_XRAY_CONTEXT_MISSING=LOG_ERROR

# fix permissions
RUN chown sbx_user1051:495 /tmp && \
    chmod 700 /tmp

# Switch to the task dir to get ready to inject the Code
WORKDIR /var/task
… to be continued -> Reverse engineering of the original AWS Python Lambda Dockerfile and look how close I came by diffing both :)


Time to reuse the crafted Base Image and give it a pythonic flavour based on the real extracted python 3.8 runtime. The Image looks like this:
######
## Stage 1: Copy layer - could be done in one step but better copy it to be prepared for the future
######
FROM scratch as runtime
# Copy extracted python runtime
ADD ./python3.8-extracted-runtime.tar.gz /opt

######
## Stage 2: Inherit the baseimage and enrich it with the python 3.8 runtime
######
FROM ghcr.io/benjitrapp/asimov-lambda-baseimage:main

# Copy the runtime into base image
COPY --from=runtime /opt/* /var/

ENV PATH=/var/lang/bin:$PATH \
    LD_LIBRARY_PATH=/var/lang/lib:$LD_LIBRARY_PATH \
    AWS_EXECUTION_ENV=AWS_Lambda_python3.8 \
    PKG_CONFIG_PATH=/var/lang/lib/pkgconfig:/usr/lib64/pkgconfig:/usr/share/pkgconfig \
    PIPX_BIN_DIR=/var/lang/bin \
    PIPX_HOME=/var/lang/pipx

# Update and install python dependencies
RUN pip install -U pip setuptools wheel --no-cache-dir && \
    pip install pipx --no-cache-dir && \
    pipx install virtualenv && \
    pipx install pipenv && \
    pipx install poetry==1.1.4 && \
    pipx install awscli==1.* && \
    pipx install aws-lambda-builders==1.2.0 && \
    pipx install aws-sam-cli==1.15.0

USER sbx_user1051

ENTRYPOINT ["/var/rapid/init", "--bootstrap", "/var/runtime/bootstrap", "--enable-msg-logs"]


So far I could recognize that the Lambda service is divided into a control- and a data plane. Let’s discuss both on a very high level perspective:
- Control Plane: Like in k8s the control plane is responsible for the function management API (all the actions like CreateFunction, DeleteFunction, UpdateFunctionCode, …)
- Data Plane: Responsible for the invocation API that how the name already tells invokes Lambda functions.The Lambda invocation flow is a whole set of services working together to provide the complete range of functionality that Lambda provides.
These services are:
- Worker — A secure environment where your code will be copied to and executed.
- Worker Manager — As you might have guessed by the name, this Service manages the workers. It tracks the usage of resources, execution environments and handles the assignments of requests.
- Frontend Worker — This worker receives function invocation requests, validates them and dispatches the requests to the Worker Manager.
- Load Balancer — Distributes invocation requests to multiple frontend invokers across multiple availability zones (AZ). When an AZ failures is detected, requests are routed to another AZ automatically as failover.
- Placement Service - Manages the packing density of sandboxes on Workers and a Counter Service that’s responsible for tracking usage as well as concurrency limits.
Now let us put the above services into correlation by abstract it into a flow. This flow helps to understand the interaction:
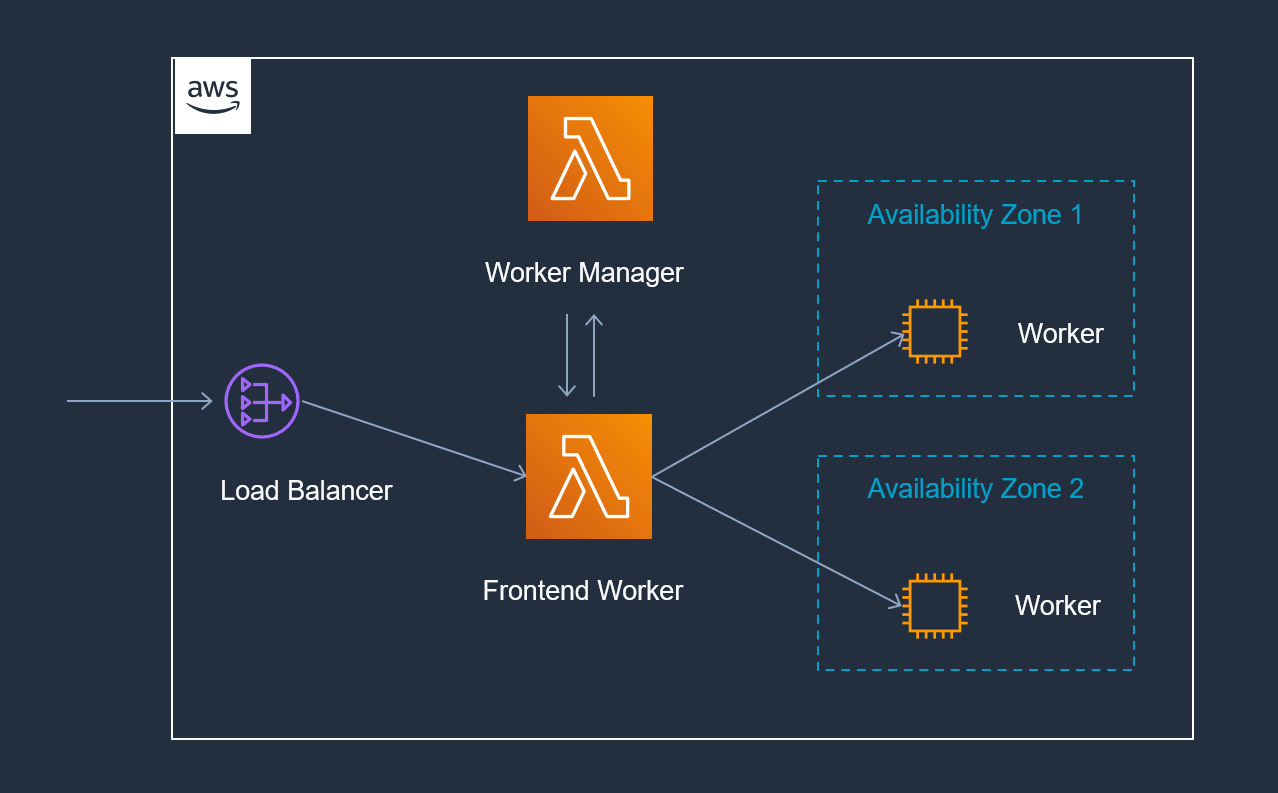
As shown above it would look a bit like this: Incoming invocation requests are passed from a Load Balancer to a selected Frontend Worker. This Frontend Worker validates the requests and asks the Worker Manager for a Sandboxed function that can handle the function invocation. The Worker Manager either finds a pre-existing Worker or it creates a fresh one -> this can be watched as cold start penalty. After copying the Function code, the Code gets executed by a Worker.

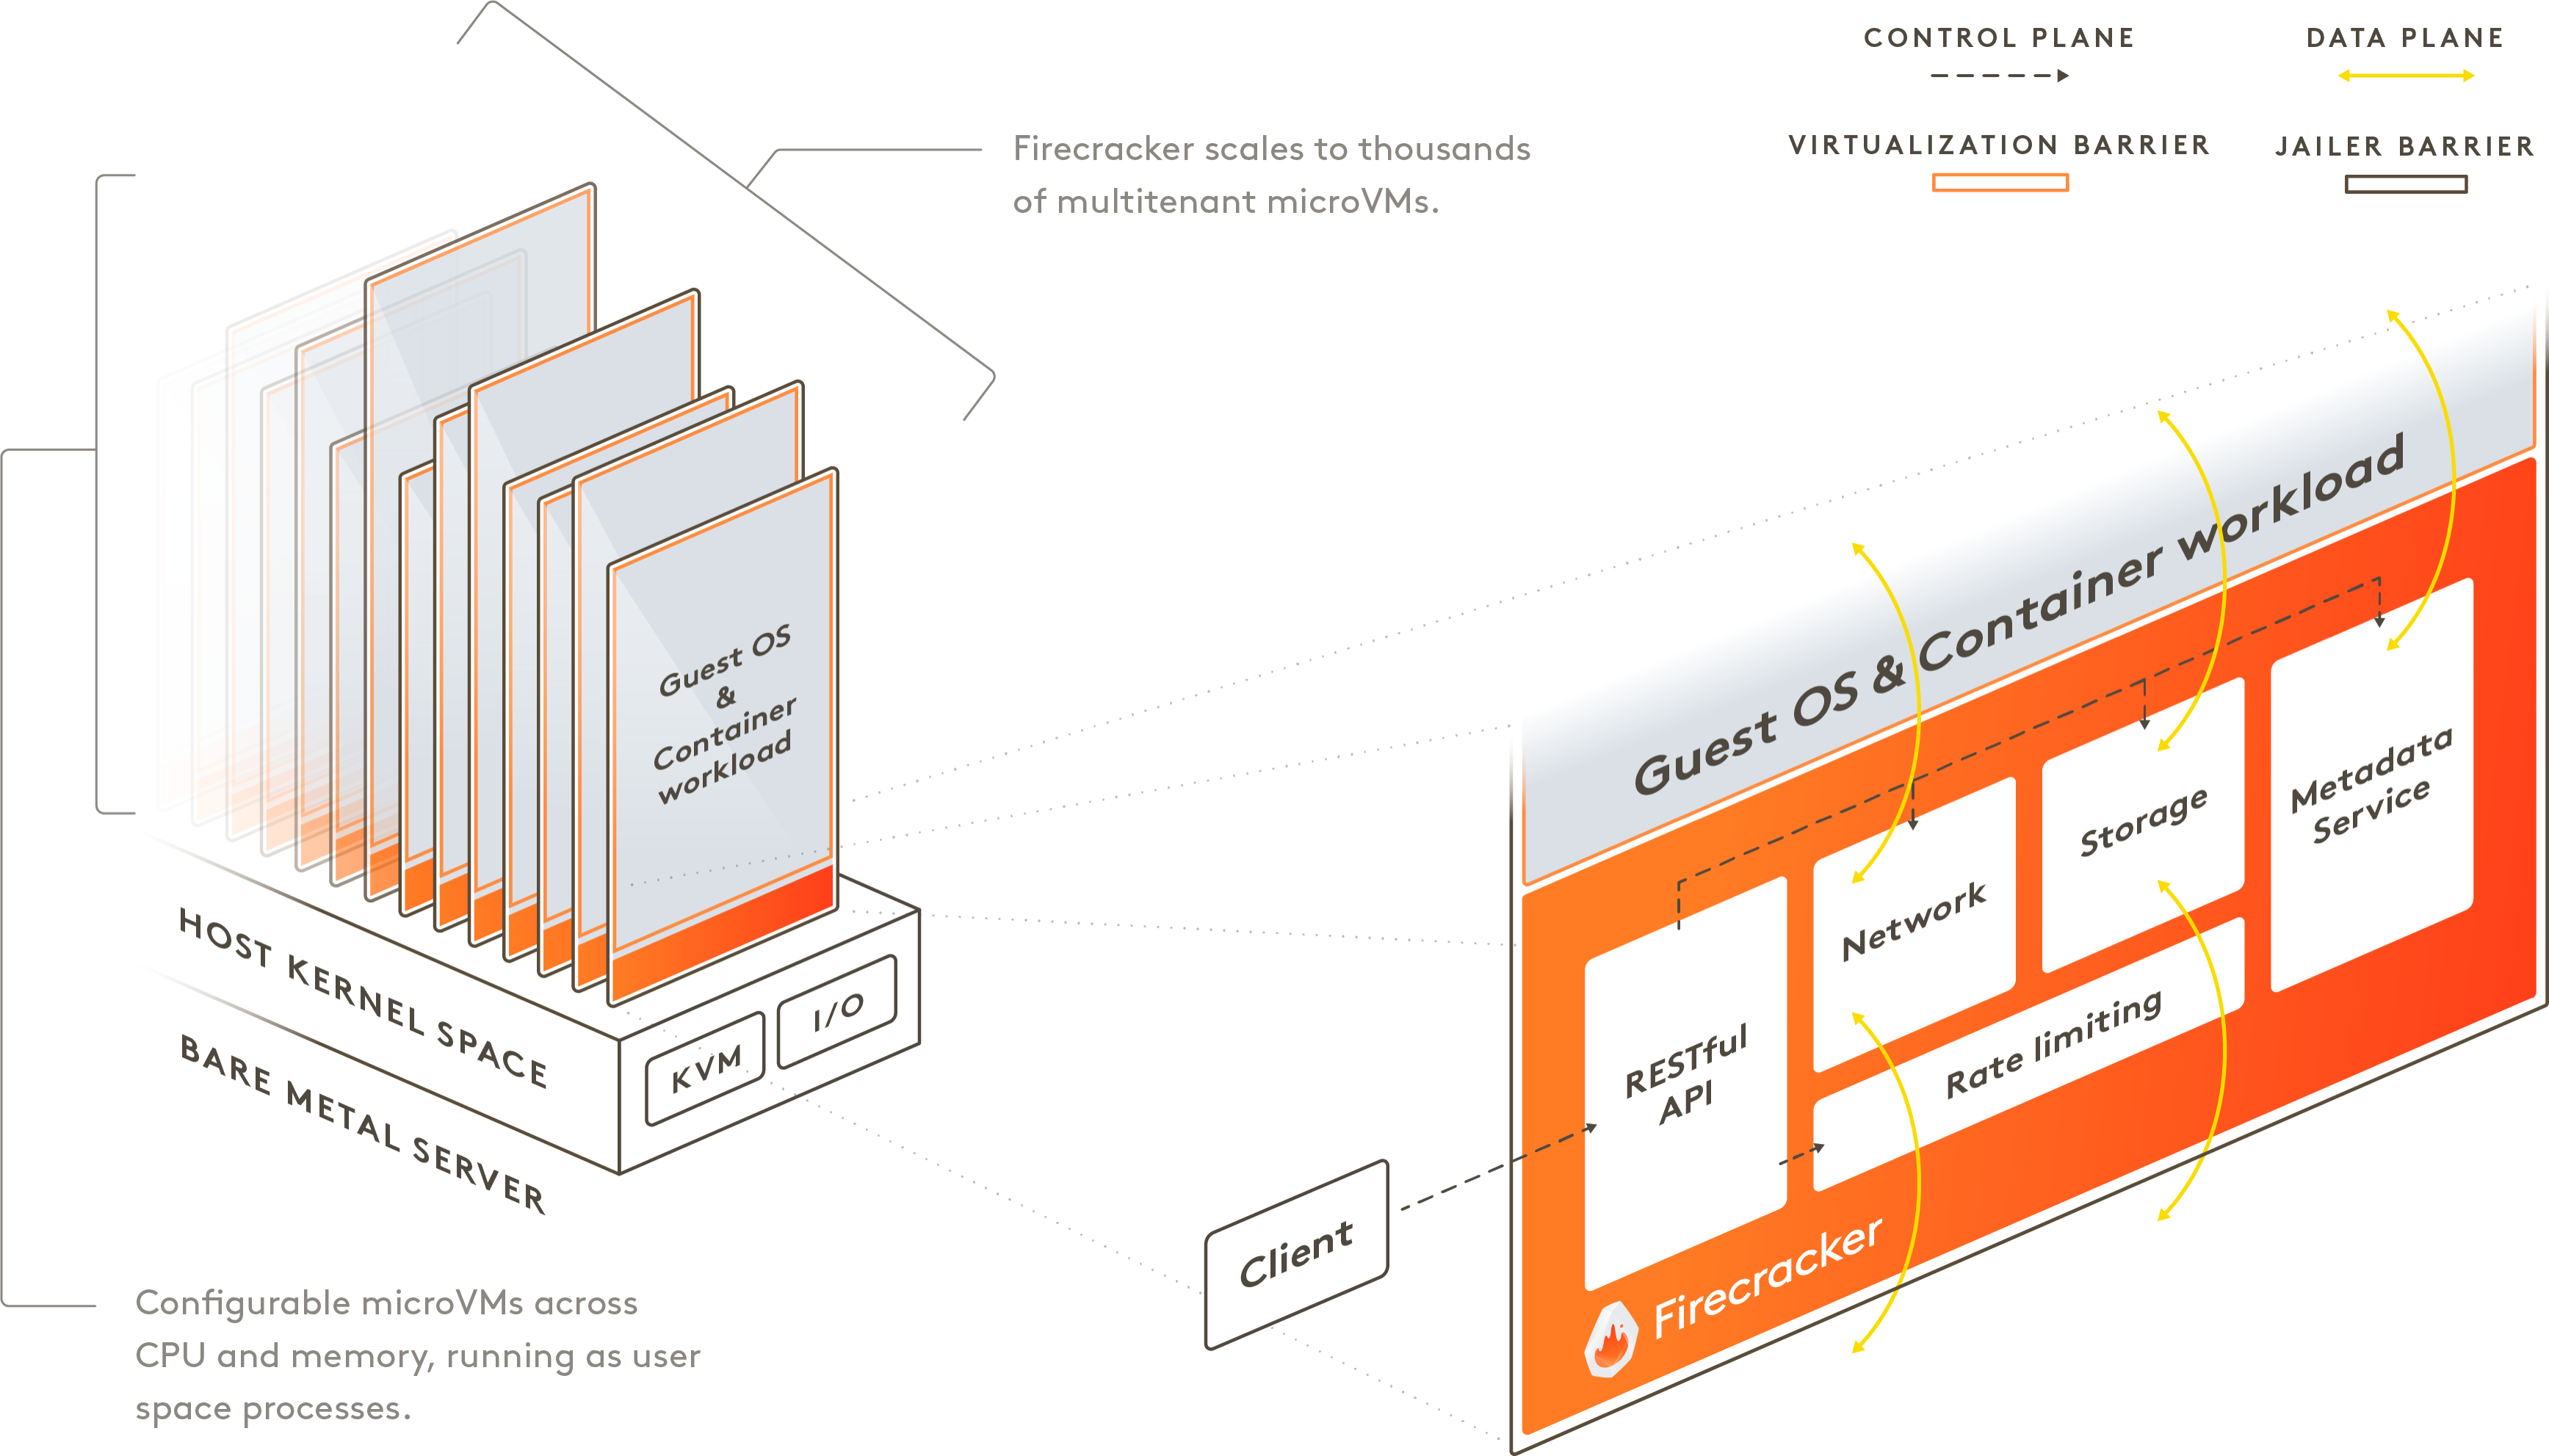
If we take a look at Firecracker - the Workers are typically EC2 instances that have multiple functions being executed on them. These functions are owned by multiple users, not just a single user. To keep this method of execution secure - each function runs in its own secure Sandbox. Each Sandbox is air gapped (totally isolated from other Sandboxes) by using things such as cgroups, namespaces, iptables, etc.
Sandboxes can be re-used for another invocation of the same function (what typically is called “warm”). As an interesting aspect a Sandbox will never be shared across different Lambda functions. These Sandboxes have a lifetime of the duration of the function execution and wont be destroyed after elapsing of some retention time.
This mighty technology provided by Firecracker, is an open-source project that is developed by Amazon. Firecracker allows for thousands of lightweight sandboxes to be executed in a single Worker environment and got in my opinion a lot of similarity to k8s on a very high level perspective.
If we think back at the early beginning of container technology we have some interesting dates:
- 20 March 2013 first release of Docker
- June 2014 first release of Kubernetes
- November 2014 AWS Lambda was launched
The dates are too close to each other - so I think there wasn’t anything copied. Based on the Firecracker Architecture and the progresses regarding bottlerocket-os, the AWS Lambda Worker could be easily refactored/enhanced from a microVM to a container. Even though the microCM approach is pretty cool. Let’s see how this journey continuous.

◀ Back to the Blog